Saturday, September 10, 2011

Another one of the top 10 made.. Simplicity 2599

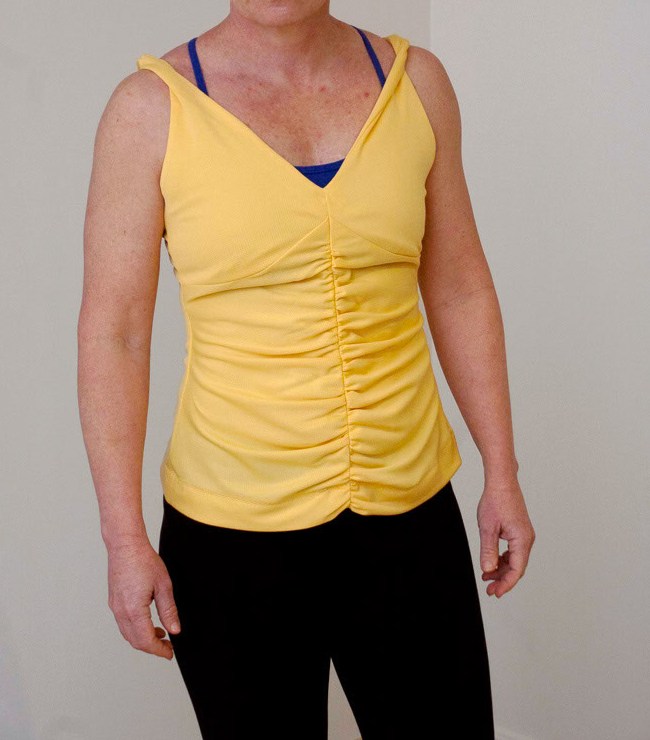
I was so excited to finish this top, I have done the thing I don't normally do - the mirror self-portrait!

This is Simplicity 2599.  This top is also another one of the top 10 patterns of 2010.  If you read my blog, you may know that I have set the challenge to make all top 10 outfits (a follower I am!)

 
This version is my trial version made in a polyester chiffon (yoru?) which cost all of $5 m and seemed perfect for this top.  It is Version B with cap sleeves and vertical ruffles.


I was concerned when I first tried it on after inserting sleeves that it would be too tight across the shoulders.  I need to get a photo of the back and try wearing it for a day to see how it goes on that score.

  As you can see, it fits Diana very well across the back, but my shoulders are a little broader.


This is a great little top.  It has different cup sizes and I am the b-cup as my high bust is very similar to my full bust (that's those pecs I have worked on so hard ;) )

Even with the cup sizes I found I had to go down a few sizes as the ease is massive in this top.  I am a 34" bust which corresponds to a size 12 but it had something like 5 1/2" ease across the bust - too much for me.  I went down to the size 8, which has 3" ease.  

The other things I did were to leave off the button closure at the back as it slipped on very easily without this, so even though I think it looks cute, I know I will never undo the button.

I also left off the facing and used rayon seam binding to finish the neck edge.  I did as others have done with this too and used a roll-edge hem to finish the ruffle edge. 

The only tip (which I hope will work through the wash!) is that the ruffles are attached with two rows of stitching 3mm apart and the edge is raw.  As this fabric ravels terribly, I made the second row of stitching a narrow zigzag and then trimmed close to the stitching.  I am hoping that it will keep it tidy as well as hold it through washing.  I used my duck-bill scissors to trim the excess fabric.  I love these scissors - you don't want to be cutting a hole in your top at this stage!


Lulu was my sewing helper today and as you can see gave my top the seal of approval...


I am now washing my very expensive piece of silk to make another version of this cute top... Ciao!

Monday, September 5, 2011

Butterick 5566 - denim skirt.

I am trying to begin some sewing for the change of seasons.  We are officially in Spring now and the days are slowly warming up.  I am so over my winter outfit which always included pants, that I had to sew for my first piece, a new skirt.  I made Butterick 5566.

I made View E as a few other sewing bloggers have done in a denim.  This denim was bought at the Fabric Collection at Sumner Park.

My most favorite part of this skirt is the facing (only a sewist would say that!).  I used a scrap of Japanese quilting cotton.  I did not have a large piece of denim and thought it would be too thick anyway, so used this quilting fabric which I fused with a lightweight interfacing.  I finished the edge of the yoke with rayon binding tape and added my tab on the inside at the zipper to avoid using a hook and eye at the top of the zip.


From the back...


These photos are taken at the end of the work day, but I think the skirt stood up pretty well.  It wasn't the warmest day that day so I paired it with my Burdastyle Turtleneck top in black bamboo (so soft and comfy!) and my Phoebe Jane vest.  

Full disclosure here in the interests of Self-Stitched September.  I am not an official participant but I do enjoy seeing what others are wearing and I do try  and wear something I have made myself, most days.  This day I got the full deck of cards! :)

Sunday, August 28, 2011

Boxers for the boys... Jalie 2326


I am trying to get organised for Xmas early this year and have decided to make as many gifts as I can.  I usually give my boys satiny boxers which they like to sleep in, but they don't like the ones with silly sayings and pictures on them, so by making them I am able to get some nice fabrics and patterns.  The fabric I used is a poly satin bought when Lincraft had a 1/2 price sale.  I have actually made 3 of these, but one pair is already in use by my DH as he was the crash test dummy in regard to fitting.  His fit well apart from some feedback about the elastic length and so I made two more - one for each of my sons.
A silver/grey pair for my eldest (the same size as DH) so I only had to cut two pattern sizes.  I chose the pattern sizes based on hip size.


They are photographed here on Diana and they hang a little crooked as Diana's stand has to go through one leg so that distorts them a bit.  I am sure they will look a little different on the boys too as they  do not have hips!   However after seeing these on Diana I am thinking I could make myself a pair as summer jammies too :)

This pair is for DS the younger.


For the elastic I found 'boxer elastic' and sewed it multiple times on the lines and I think it gives it a very RTW look.  The pattern only has you sew it at the top and bottom of the elastic.  This elastic is also soft next to the skin.

I love this pattern as it details how to do a fly.  


My only complaint about the pattern would be that the elastic size for the waistband is not specified and as I was sewing them as gifts and can't try them on the recipients I would have liked to have this information (even just as a guide).  That is why I had to give DH his as I needed to work out how to size the elastic and it seemed silly to take them back to wrap for Xmas after he had worn them!

Overall I love this pattern and my DH seems to like wearing his set.  Now if I could out what size to make for my Dad I could knock over another gift! 

I have made a skirt but because of the cool weather haven't worn it yet so haven't got a photo.. maybe next post...Ciao!

Sunday, August 14, 2011

Some photos of finished projects...

 I have made a couple of more things I have not reviewed and do not intend to review.  However I did get some photos last time my camera man was available.  


The top is a Marcy Tilton pattern 8636.    This pattern was gifted by a mate - thanks Lynn!   I made it with a knitwit mesh called Italian Animal Fantasy Mesh ( no 4 in this link.)  I backed the main body pieces in a chocolate brown jersey I bought on sale once and wondered how I would use.  I like this top - Have not been able to wear it yet, with the cold weather but look forward to the chance! :)

The skirt is a lovely black matt rayon jersey bought from Gorgeous Fabrics. The pattern is from Style Arc - the Fay pattern.  Very simple - easy to make, could be a little shorter for me - maybe next time.  It has an interesting 'bag-out' hem - fabric doubled over to create the hem.  This works as it means you can make the skirt from a light weight fabric as it is doubled over.


 Then crochet - a beanie made for my Dad... ravelry link here.


And another beret - this time for my Mum in an alpaca blend...


Ciao for now - next up skirts for Spring...

Tuesday, August 9, 2011

Gym Top! Burdastyle 07-2010-115

Another gym top - this time, one I do actually wear to the gym!  

 Burdastyle 07-2010-115 - not intended as a gym top, but I thought it might work (and it does!)


The fabric is a technical jersey from Gorgeous fabrics .  A really pretty blue and has a self stripe with little vented holes so comfortable to wear in a workout.  Again I have my dark blue crop underneath so it shows it is quite low at the front, but echoes the crop top's lines so I like the way it layers.


The back is cute but fits my dressmaking dummy better than me - too much weight training???
Anyway I am wondering how I could alter this to lose the creases under the arms.  Perhaps a wedge added to the top at each side?


This top, while not intended as work-out wear suits me well for this purpose.  It is quite comfortable to wear to the gym.  I have worn it to boxing classes as well as to weight train in.  I wouldn't mind adding a little to the length if I made another one and I may see if I can work out how to get rid of the creases caused by the broadness of my back at arm height.

I followed the pattern and found the use of the vilene bias tape on the upper edges of the top and straps to make the construction quick and painless.  I was lucky to find I had some, but it did use up the roll so I will have to get more before I try this top again.

I am going to review this pattern and link it here.  Does anyone have any favorite patterns for workout wear??  I would love to hear about them... Ciao for now!

Thursday, August 4, 2011

Gym top?? Burdastyle 05-2011-107

I wanted to make some gym tops from some technical fabric I had stashed away.  I went through my Burdastyle mags and 05-2011-107 struck me as a cute top that might work for the gym.  

My blue crop top is layered underneath the Burdastyle top and this is how it came out...


I actually really like this pattern and I am loving the buttercup yellow colour...


But will it work for the gym??? Not sure... I may just chose to use it as a casual week-end top with shorts or jeans.

Well, I love this pattern and I love this yellow top but it may not be used as the gym top I had planned.  What is for sure is that I will be making this pattern up again in a nice rayon jersey ready for summer!

Review link is here.

Ciao!... another gym top soon.

Wednesday, August 3, 2011

Another pair of pants Burdastyle 04-2011-117 again

I made my first pair of Burda 04-21011-117 in this post.  They were essentially a wearable muslin, and they work so I made another pair.  This time in a wool tweed from Gorgeous Fabrics.    I wear these pants a lot as they are warm and comfortable. 

These photos are taken after a day at work so please excuse wrinkles.

The obligatory back shot.  I do get some wrinkles, but am not sure it means anything.  Anyone better at fitting pants please chime in!

The pocket I forgot to show last time.  This time I used a rayon lining fabric to make the pocket bag and the pocket has no 'line' that shows through.


The petersham waistband.  This is easy to apply and comfortable to wear but it does assume you wear tops over the top (not tucked).


Overall a good pattern, if you like the narrow leg style.  I do believe I need to make one adjustment if I make these again - a front muscular thigh adjustment, which basically splits the front pattern and adds some width at the thigh.  It does feel like it pulls a little here and I will be interested to see how it affects pair no 3. when  (if) I get around to making them.  Review link is here.

Parting shot ... Lulu inspecting the work done in the new kitchen...