Wednesday, April 25, 2012

Muslin.. Burda 12-2008-109

I am going to a ball!  Yay!  An excuse to frock up - always good!  I don't own a long gown, so this is my chance to make one.  The pattern I have chosen is Burda 12-2008-109.


Where can I find a cut-out Bambi to accessorise this dress, I wonder??


The line drawing ...


This is a 3 dot pattern, which Burda describes as Intermediate difficulty for advanced learners.

The hardest part has been interpreting the Burda-speak to work out how piece 8 (the shoulder band) went on.  I have sewn a muslin to check fit and to make sure I could work out how to make it.  I took some photos after I worked it out.  I had to put the facing together first then pin the front and back to my dummy and then from there work out from the facing piece where the shoulder band is sewn.  Once I worked it out, the instructions made sense!


I have included these photos in case anyone else chooses to make this dress.  Hope it helps! :)

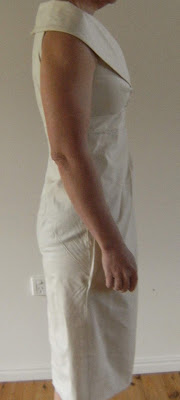
I have completed the muslin and have the mugshots here, so that (I am hoping) you can provide a little feedback on how it is fitting.  (My shoulders aren't actually crooked, it is just the collar which is sitting crooked.) 


The alterations I think I need are:
  • Enlarge the armhole slightly.
  • the back is a little tight just above the band.  I think I may let the darts out on the bodice back a little.
  • maybe add a smidge more space to the side seams at hip level.
What do you think?


Thursday, April 19, 2012

Colette patterns Biegnet skirt


Finally finished and worn and photographed!!

The Colette patterns Biegnet skirt.  This has had great reviews and looks great on everyone.  I love it as much as everyone else.  It is a lot of work for a skirt, but so worth it!  It has taken me such a long time to make this I cannot remember too many details for this post.  The main points would be:
  • pretty much made straight from the pattern.  I did muck up one of the front pieces by cutting it slightly too long and then wondered why the pieces did not fit together perfectly... however my fabric has a bit of stretch to it, so I just stretched it (as you do!).  When I went back to the pattern pieces to check the placement of the belt holders, I realised what I had done... it doesn't seem to have had huge ill effects on this skirt... but I have fixed the pattern piece for next time!
  • I used a rayon-poly-lycra woven with enough stretch to make this skirt super-comfortable.  The lining is a rayon.
  •  I did muck up one of the buttonholes (not sure what happened there) but with a lot of unpicking and a bit of interfacing and some stitching over, it seems to be ok now... phew!
 I decided to cover my own buttons...so this was the button factory...


I interfaced the fabric for the buttons with a light interfacing to try and minimise the shiny metal showing through.
The fabulous lining in this skirt, which is a bit of work, but makes it feel great to wear...


The only other interesting point (to me anyway) was that I finally decided to use my sewing machine feet and used my blind hem foot.  After looking on the Internet as to how to use it was easy-peasy... why haven't I used it before?

Love this skirt...


...and my new top!  This outfit felt so comfortable to wear all day.

Parting shot.. I had a great mail day today.


A beautifully made coin purse from a great sewing buddy and a pattern for an on-line sewing course .... and no bills! ..Ciao!

Monday, April 16, 2012

Bateau neckline top - Burda 02-2009-108

The Bateau neckline top that was a best pattern of 2009.  I have made this top before in 2009 (twice) and even though it is not a really difficult top to make, I think I have made it more successfully this time round.  My sewing has improved I think.

This time I made two versions a print and a plain ivory cotton/elastane, both with the 3/4 sleeve option.

The patterned fabric was stash fabric bought some time in the last few years (no blog record of buying this one).  It is a fairly lightweight fabric but has good cool weather colours so I thought it would work for the change of seasons and as a layering piece (until it gets really cold!)


 I am sooper happy with how this turned out.  Before I made this one, I made one in a recently purchased fabric from Lincraft.  It is a cotton/elastane mix - great quality, good ivory colour and sewed up beautifully, but did not photograph so well! :(

I tried to press it and the iron spit-up on it and now it looked worse than before it was pressed...


 I have sent it for a wash and think, once washed and pressed properly it will be a great basic in the wardrobe.

Since the last time I made it, I think I better understand how the neckline is sewn (before sewing the shoulder seams) and I added an extra step - top-stitching the shoulder seam toward the back so that it sits nicely.  I also left the sleeves alone - last time I lowered the sleeve cap.  I think it gives it a nice crisp shoulder line and is not all that hard to sew in the stretch fabric.  I did still sew the sleeves in before sewing the side/sleeve seams - can't see the point in 'setting in' a sleeve in a knit top.

I also (in the patterned top) hemmed the sleeve prior to sewing the sleeve seam.  On such a little opening it really makes sense.  I then sew the sleeve seam down for a few cms (at the opening) so that it sits nice and flat.  This is how Ottobre seems to do them and I think it worked well for this top.  I even looked at the RTW tee I am wearing today and that is how the sleeve hems are done as well!

Another infinity scarf.  This time rather than piecing scraps, I used a pattern -this one.  I did not make mine quite as wide.  I had one yard of fabric and basically cut it into half and made two scarves.  One is planned as a Mother's Day present for my Mum. The fabric I used is this one from Gorgeous fabrics - uber-soft rayon blend - a lovely soft, stretchy sweater knit (at least that is what I would call it).  I had bought this fabric previously in a different colour and loved it but when I ordered this piece I must have had a brain freeze as I only ordered one yard - not enough for anything I might want to make from this fabric!  This scarf was the answer!


This is such a quick simple make I plan to find some more suitable fabric and make a few more as gifts.

My Biegnet skirt's hem is re-sewn and I plan to blog it soon... Ciao kittens!

Thursday, April 12, 2012

Romantic Notes... Ottobre wrap top 5-2011-11

Otttobre 5-2011-11 Romantic Notes, another strangely named but lovely top from Ottobre.  This one has been reviewed a couple of times but probably deserves more attention that it has recieved. 


This is made up in a rayon purchased from Knitwit probably from about a year ago, but I cannot find it in their collections.  It was bought at a roadshow so may be from a previous collection.

It has lovely blues, greys and browns in the print.  The grey is not a great colour for me but I am hoping the blue and brown will win out and I will be able to coordinate this top with some browns I have planned for my winter wardrobe.

The obligatory back shot.  I have made no alterations to this pattern.
 

It does not show in the photos above,  but there is quite a bit of detail in this top.  The collar has pleats ...


which lead around to the pleats at the front...


The collar seems to sit better on Diana than it does on me.  I hadn't noticed that before these photos.  I will have to check this out more carefully next time I wear it.  However the collar sits on me, very similarly to the one pictured on the model in the magazine, so maybe I can just better adjust it on Diana (and she doesn't move about).


This is how I see me wearing it this winter, but with a brown cardi and perhaps a nice chunky necklace or colourful scarf...


Slowly catching up with my posting... better get back to sewing... Ciao kittens!

Cool Hippie... Ottobre turtleneck top 5-2011-8

I am starting to prepare for the cold weather and have been looking at what my wardrobe needs.

I have a cream turtleneck top (RTW) which does a very heavy rotation through my winter wardrobe, so thought that might be a good place to start.  I have been through my patterns and settled on Ottobre 5-2011-8 Cool Hippie.  I used a stash fabric to try it out and did not have enough for the sleeves, so ended up with a sleeveless option which I like to wear under a cardigan in the office.  

Excuse these photos the collar is curling up at the front, but I have it pulled too low at the front... it doesn't usually sit like that, but my photographer was so intent on checking all the technical aspects of taking the photo, he neglected the fact that the collar was crooked!


I cut the collar piece the wrong way the first time and had enough fabric to cut another but realised after I cut it out that I did not leave seam allowances on it.  So this collar is a little tight, but still wearable.

This photo on Diana shows the collar (not rolling back).  It also shows the stitching detail around the neckline which top stitches the seam down.  I used the honeycomb stitch (Stitch No 25 on my Bernina 440).  It is one of the stitches recommended in the pattern.  I really like it used here.


The back shot...


I have already worn this top to work with my Jalie cardigan and I am really happy to have it in my wardrobe.  The fabric is a cotton/elastane blend rib from Fabric.com.

For my long sleeved version, I wanted an ivory/cream fabric and managed to find a self-stripe cotton blend (not 100% sure of the fibre content) in a funny little store in town, that had a pile of remnants bought from another shop which was closing down.  It was $7.50 for a large piece and I managed to cut this top as well as a Jalie camisole.

The collar and cuffs are meant to be made from rib, but I used the same fabric throughout.  I would love to make another one with the rib collar and cuffs, if I could find some fabric for it.


The only pattern alteration made to this one, was to take it in slightly at the sides at waist level.  This time the collar is cut correctly and is a lot more comfortable.

I really like how the cuffs are attached, using the honeycomb stitch again.


I actually liked the way they instruct you to add these cuffs as their method reduces bulk, which may be an issue if you used a rib fabric.

I also ended up making an infinity scarf (no pattern) from a scrap of fabric while I was in my sewing room.  I really like these colours together.

 Another Ottobre top next post and I will eventually get to my Biegnet skirt.  I stuffed up the hemming and need to redo it, but I am waiting until I get black thread on my machine again... We all do that don't we?

Monday, April 9, 2012

StyleArc Maggie Jacket

StyleArc Maggie jacket - what can I say?  

A great pattern - fabulous drafting but minimal instructions.  I have to say though, I really enjoyed the challenge of putting it together.  

It was a good test to see how my sewing skills are going and I think I rose to the challenge! :)


 I don't think it looks exactly like the diagram, as the collar sits much higher when the zip is shut.


However, for this style of casual jacket, unless I was out on a real chilly day it will be worn unzipped with the collar lying open, which I really love.


 I used some stash fabric, a black rayon blend double knit from Gorgeous Fabrics.  It is lovely and soft and I think a good weight for this jacket.  I had to buy the fabric for the contrast trim (inside collar, pocket tabs and zip front) and I snagged a really soft pretty blue corduroy from Spotlight for $2 for the metre from a sale rack (usually $12/m).  I love the soft fabric at the neckline - makes it lovely and luxe feeling to wear.  The only difficulty is that it is doubled over for the pocket tab and ended up so bulky it was difficult to sew the seams near it.


 As you can see in the pocket detail photo above, I found a rib which is striped in grey/black.  I wanted a nice heavy rib and found this at Crafty Mama's.  NAYY but I love that site for bits and pieces like this - no postage cost in Australia!  I would not be able to find such a nice weight rib locally so was very happy with this one.


 The jacket is lovely and long, so keeps your hips warm - I like that!

And the shot on Diana.  I found a zip locally and had my first shot of shortening a zip by myself.  I was happy to learn that new skill too.


When I get some time I would love to sew another of these jackets, as this casual style really suits my lifestyle.    

 More cool weather sewing to come next post! Ciao...