Monday, June 28, 2010

Textile Art Festival

Not much sewing this week-end as DH & I took a week-end off to stay in the big smoke Brisbane. We stayed at our favorite hotel at Southbank.

View of Southbank & the city from our hotel room...


Saturday afternoon was spent shopping in the city and I bought a fabulous leather bag from the sale at Myer and a pile of gym clothes from Lululemon Athletica. This was my reward for finishing a challenge at the gym (I lost 3.6% body fat and went down a size!)

On Sunday morning I went off to check out the Textile Art Festival held in the Convention Centre (conveniently next door to the hotel).

They had a great range of displays. I saw and loved the 12x12 art quilt display. It was fabulous to see these quilts in the flesh!

Some of my friends had items in the displays - this is a bag my friend Linda had in the Embellish a Bag challenge...


She's a very clever lady!

And my haul for the day...


The fabric does not show up in the photo well, but it is a beautiful cotton stretch dyed in a gorgeous blueberry shade. This was from a group called the Natural Fibre Knitting Mill - the fabric is milled (knitted?) in Brisbane from all Australian cotton and then they dye it as well. Really lovely quality and I am going to have to find a special pattern for this fabric.

In the front of the photo are some hot-fix studs, which I have been wanting to try to jazz up some simple tee's and my most exciting find was a shop that specialised in crochet!

It was called Jenny King designs. Lots of fabulous yarn stalls in the exhibit but they all concentrated on knitting (which is not my forte) so I was really excited to see this stall full of great patterns for crochet. See these great designs I loved the lime vest and nearly bought a kit, but piked out and bought the bobble scarf kit first to test out my rusty crochet skills.

So good time had by all....

Next post Vogue 8593.

Saturday, June 19, 2010

McCalls 5522 - take 2

This top has been the most long-winded project I have worked on for ages. It is McCall's 5522. I made the 3/4 sleeve with ruffle earlier for the mini-wardrobe contest and you can see it here if you are interested.

This one I made the long sleeve, no collar and no ruffle. From memory the only alteration I made was to shorten the sleeve length by about one inch.

These photos were taken after an afternoon in the office, followed by drinks and dinner after work, so you will have to excuse the wrinkles. I did try to get the photos earlier in the day but DH was run off his feet, so it had to wait for the end of the night.

I am not as pleased with the fit of this one compared to the last one. The collar band is sitting a bit funny....


I didn't trim the armhole before inserting the sleeve this time, as I didn't feel it needed it but now I am not so sure... I think the back looks a little wide at the shoulder and the sleeve fit doesn't work so well at the back.


Anyway, it is not so bad I won't use it but I think I will leave this pattern alone for a while and use another shirt pattern next time.

At least now, I am free to move onto something new. Time for a frock, I think!

Thursday, June 17, 2010

Burda 12-2009-112 black skirt photo shoot

Photos of the black one - lucky I work with men - they don't pick up that you have worn the same skirt style two days in a row!

These are the best I could salvage from my son's efforts. Overexposed...

Excuse the power pole emerging from my head!

Wednesday, June 16, 2010

Burda 12-2009-112 plaid skirt photo shoot

Not many words here, mainly photos. However here is a link to the pattern (thanks Mary Nanna!), and a link to my review.


You can pattern match on one side, but not both!


Photo shoots of the other skirt and my McCall's blouse (which is now completed!) still to come...

Monday, June 14, 2010

Burda wof 12-2009-112 Skirt

I have just finished two of this skirt - Burda 12-2009-112. I am not even going to try and find a link for this pattern.


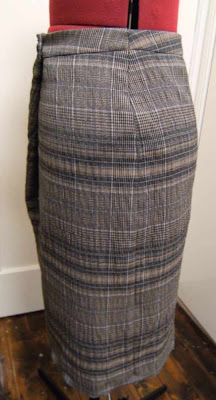
The first one is a poly/viscose/spandex blend in a plaid which has a crimply texture.

I decided to line this version as I thought the fabric needed it, however from reading up on this skirt I realised I would have to underline it because of the way it is constructed.

I had read this tip earlier, but of course couldn't find it again when I wanted to read it again, so made up my own version. I would recommend following the tip as it looks better than how I have finished this skirt, but I am still happy with what I did.

To underline and seam finish in one, for the front and the back:
  • I cut the hem allowance off the underlining piece.
  • I sewed the darts in the fabric and the underlining (in the back)
  • I then put the fabric and the underlining RS together and sewed together on the sides with a narrow seam (I used the overlocker)
  • turned RS out, pressed and then basted the top edges together.
this is the back piece after this process...

The pieces are then treated like normal and when the side seams are sewn, you need to take into account the little bit of seam allowance lost to sewing it to the underlining. The other advantage is that the hem is stitched to the underlining fabric so you cannot see your stitches from the outside.

Finished skirt - I had to press the pleat a bit on this fabric as it was too pouffy. I am not sure if that is the result of this fabric (my suspicion) or the fact it is underlined. In this photo the hem still needs a better press.

The button close up... this is a good pattern to use those one-off buttons from the button box.


A fuzzy pic of the back... (the horizontal part of the plaid shows up more strongly than I expected it would!)
The side with matched plaid. Please note if you make this in a stripe or plaid, you can only match one side not both! So if that bothers you, don't choose a plaid.


The inside of the finished skirt (back) where you can see that I used rayon seam binding on the edge of the inside waistband facing. The waistband is stitched in the ditch from the front to hold the waistband facing.
And the buttoning process. There are two buttons (one on the inside waistband) and three buttonholes. The inside button is buttoned through one buttonhole...


Then the waistband is folded and the second button is slid through two buttonholes which are folded against each other (hope that makes sense). Where my fingers are is where the inside button is...

See the inside button here and the folds of the waistband...


I loved it so much I went shopping the stash and found this black RPL and made a second skirt. I did not underline this one and the pleat falls naturally in a much better fold that does not require pressing...


Fuzzy picture of the button. I found this covered button in my button box (which has buttons handed down from my Grandmother and mother). It looks like a crepe fabric but matched so well and gave the skirt a lovely 'office-wear' finish that I had to use it. My only concern is that it is so old it might deteriorate before the skirt does, but I checked that I have other suitable buttons in the same size if I need to replace it.


The inside waistband again finished with rayon seam binding and stitched in the ditch from the front. This is an identical finish to RTW pants I have.


And my tip to finish the hem. Before hand sewing the hem, I cut a strip of iron-on interfacing and pressed it at the height of the hem. then when you sew the hem the stitches are caught only on the interfacing and the stitches do not go all the way through to the front of the fabric. Gives a lovely finish on the outside.


I am going to do a 'fashion shoot' through the week as I wear these new skirts and show the photos later.

Now I need to go and sew buttons on the McCalls top - still!

Thursday, June 10, 2010

Some questions and a preview to show their is some movement in the sewing room...

I have had some questions lately in the comments and I just wanted to answer them.

Ann-Marie from the Netherlands asked:

Love the way you dyed the fabric, may i ask how you did this?
I have lots of white fabric and my complexion prefers ecru.

I used a dye called i-dye which I can buy locally from Spotlight (a fabric and craft chain store). It is easy to use in the washing machine and has given me excellent results. I now look to buy good quality cottons in white on sale to dye to colours that I can wear (NAYY).

Gail asked where I get my bamboo fabric from:

The bamboo fabric I made into the orange top was dyed fabric I purchased from an ebay seller many years ago. I would not recommend this fabric as it shrinks easily and is very thin. However saying that, I love bamboo fabric and if I were going to buy some now, I would get it from The Bamboo Fabric Store, again NAYY, but I have bought some of their woven bamboo and seen samples at ASG industry days.


The long worked on McCalls top waiting for buttons - now it looks very plain but will look better when I get my black buttons on it - better photos to come.

And this is the next in the queue, Burda wof 12-2009-112 skirt

And these are the fabrics, a lovely plaid from the remnant bin at Gardams and a lovely blue rayon lining (in need of an iron here)


More 'real' photos soon...

Wednesday, June 9, 2010

Deco Vibe Flippy Skirt ... take 2

I have not had much sewing success lately - in that I haven't finished much lately (as you can tell from the lack of posts!)

I am still working on the MacCalls top (and the ruffle isn't on the agenda any more). My reason for not finishing this top is my thread mysteriously vanished (think brown cat) and after I bought a new reel of thread, it did re-appear!

However in the meantime I started sewing another Deco Vibe Flippy skirt. Pattern cover pictured at the end of this post or can be found here. This one in a 'cheaper' double knit (than the last one). Ponte de Roma from Spotlight in a lovely dark brown.


Also in a size smaller (woo hoo!) The fabric seems lovely but is quite spongy and that made it difficult to match the seams. I do not have any detail photos of this skirt here but you can see details of my previous version here. See the puppy working his way into the photo..


I made the yoke lining in a rayon lining called Gold liner from Gardams Fabrics. This time though, instead of stitching it down to the yoke I used a rayon seam binding to finish the edge and left it loose. It has a more RTW feel - I will try and get a photo for you (sorry, still wearing the skirt now).

Back of the skirt (excuse the wrinkles - I have been wearing it at work all afternoon)...

and the pattern in case you don't remember it...
I love this skirt and will be making at least another black one in a double knit (yes, like the last one BUT a size smaller). Hopefully my next post will happen much sooner and I will show you my finished McCalls top (which looks like it will go very well with this skirt. After that a Burda skirt - I would give you a link but since they changed the site - I cannot find one)..

Tell me - the shoes I am wearing are cream and brown - can I wear them with this skirt, even if the brown in the shoe is lighter than the brown in the skirt?