Sunday, June 28, 2009

The shirt continues & shopping...

Well - I was hoping to post photos of my skirt and perhaps a finished shirt - not yet *sigh*.
The skirt is obviously finished but it was cold this week-end so nothing happened on the photo front.

The shirt - well it is continuing & continuing ....& continuing... It is the case of everything that can go wrong will go wrong! I have put the sleeves in - one lot of unpicking as I put one sleeve in backwards, then the flat fell seam - sewn three times unpicked twice! Once I worked out I needed to baste the flat fell seam (as it is a curved seam) then it worked. Now I am up to unpicking the collar - oih!
In amongst all that - I tried it on once the side seams were done & ... I don't love it! I think the gathered fronts are overwhelming. Anyway I have decided to finish it and try to reserve judgement as I thought the muslin was OK.

I had a really big week last week - last week-end shopping with Caity - bought the following fabrics at our Gardams on sale...
The first on the left - a lovely jersey print in autumnal tones for a dress, next a beautiful shirting cotton (Italian I think) - it has a self weave in it which does not show up in the photo (I am really on a shirt kick) and then two more shirting fabrics - a striped chambray and a blue chambray - much cheaper than the white shirting fabric

A big week at work, so I could get Friday off to attend a day with the Pattern Review girls down in Brisbane. It was fabulous to catch up with them. We chat a lot on the message boards (did I say we chat a lot...) and we had a lovely addition to the group Lynn from Portland Oregon who is living in Australia for the short-term.
Caity & I left Toowoomba just after 8 am and drove to the faaarrrr.. side of Brisbane to East Coast Fabrics and met up with the girls. Lots of chat as we got to know everyone but we did still manage to buy some fabrics. The two I bought - on the far left of the photo, a lovely white shirting fabric with a grid pattern woven into the fabric ($7.95/m)and at the far right, the poly chiffon (with a crinkle - can't remember what you call that) but at $5.95 /m a bargain for a nice tunic top. It has a really cute floral small scale print I love on a black background.

After we drove off and lost the others even though I promised I would lead the way... we made our way to Indooroopilly (or the shiny shops as the programmed GPS lady informed us - my husband's handy work..lol!) and stopped for much needed refreshments- coffee & lunch.
Then off to Sckaff's where amazingly, I purchased nothing. I was looking for a piece of jersey in a particular colour and they didn't have it. We left the others then, after showing Lynn the bus stop (hope you found your way OK Lynn!)
Caity & I decided to stop at The Indooroopilly Gardams to look for the elusive jersey - which I found - yay! It is the dusky purple that is in the middle of the above photo. That will be another version of the Vogue DVF wrap dress.
After that the drive home where it took us an hour to get from Indooroopilly to Wacol (30 mins longer than it should)... we broke out the nasty 80's CD and sang our way out of it....
After a brief stop at home to freshen up, Caity & I went out for drinks, drinks, more drinks and dinner with some of the girls from gym - a great night with much laughter. Next day - very tired...

Sunday, June 21, 2009

Fit to be Tied Shirt - Construction

I have been able to start sewing the Fit to be Tied shirt this week-end. I did not get as far as I hoped but thought I would show you what I have done so far.
The Hot Patterns shirt is classified as Intermediate and I don't think you could follow these instructions if you had never constructed a shirt before. For example the instructions say Join the front button bands to the shirt fronts... Well I have never used a button band before,so this is what I figure it meant to do:
Sew right side of button band to right side of front. (see the 'x' marked on the front piece - on fabrics like this where it is difficult to tell right side from wrong side, I mark the wrong side of the fabric piece with a chalked 'x' so I don't get confused - believe me it doesn't take a lot...)


This is a closer view of the gathered part of the front attached to the button band. You can see it is quite heavily gathered. You really need a soft drapey fabric for this top.

To make the seam lie flat inside the button band I overlocked the seam.

I then pressed the other side in by the seam allowance & trimmed it - can you tell I love my pinking shears! Stand still too long in my house - you get pinked!


Then I turned the band toward the inside, pressed it and edge stitched on the right side along both edges of the button band. I used my new edge stitch foot for that.


The finished button band with edge stitching.


The next interesting part of the instructions ... after sewing the back pieces together and sandwiching them between the two yoke pieces.... Fold the back so that you can fit it inside the yoke - you'll have to scrunch it up a little! Fold the fronts so that you can fit them inside the yoke, just as you did the back... this is what they mean by scrunching all the pieces inside the yoke...


Summerset of Pins & Needles has done a great tutorial on this method. I am so glad I had seen this earlier or I would not have understood what they were saying in the instructions.
Instead of sewing a bias band on to the sleeve opening. I made a placket. I learnt how to do this in a class I did recently with Felicity of For Frock's Sake. For those of you who cannot access Felicity's classes, this method is similar to the one outlined in David Coffin's Book 'Shirtmaking'. However I don't think I could have done it from the instructions in the book without seeing it first. (The colour is off in this photo - the fabric is actually a coppery-orange as in the preceding photos).
As you can see in the above photo - I hand baste a lot. This helps heaps with projects like this and I don't believe hand basting can (or should) be avoided. Yeah you can do it on the machine, but honestly how long does it take to put in a couple of hand basting stitches? My favorite gizmo of the moment which helps with hand basting is this clover tool.
You can put ten threaded needles into the holder and the threads don't get tangled or caught on everything. I read a tip once to keep threaded needles in a pin cushion (using the last little bits of thread on your bobbin, etc) and this is a great tip except they tangle up with each other and everything else they come into contact with. This gizmo allows you to put the threaded needles in , wind the threads in and yay! no tangles and threaded needles when you need them.
Parting shot - at the last Stitches & Craft Show, Caity & I attended, I purchased a pattern for a mouse pad - a wrist rest which is actually a mouse! Caity borrowed the pattern to make for another friend, but also made up one for me...


Sunday, June 14, 2009

Hot Patterns Fit to be Tied Shirt - making a muslin

This is my current project. (I know, I know I haven't done the photos of the skirt yet but I will get around to it soon).


I have bought a beautiful quilting cotton by Kaffe Fasset. I think it was called a shot cotton. Woven one way in one colour and a different colour thread the other way. I would describe the colour as a deep copper.
As the fabric was very expensive I decided I needed to make a muslin first. I usually prefer to tissue fit but in this case it wasn't going to work.
  1. I was too lazy to trace the pieces off the pattern, so copied them instead on the big plan printer at work and cut out my size from the plan paper (recycled - it does actually have plans of buildings on the other side). This paper is too stiff to tissue fit.
  2. The pattern is fairly involved with gathered bits, pleats and four pieces in the back. Too complicated to pin together in tissue.

So muslin it was. I had a piece of poly-cotton in the stash bought for this purpose. I did make up the collar and cuff even though I know it is not necessary for the muslin, but I wanted to practice them - another good reason to do a muslin. This is the front and back of the muslin made to the pattern. The only alteration I did prior to this was shorten the sleeve length by 1".

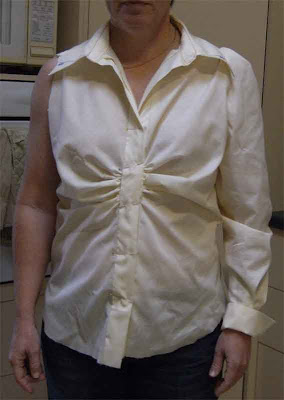
The sleeves are interesting as the shoulders are cut in and there is a pleat at the top of the sleeve on the shoulder. Very nice!
However there is too much fabric around the bust and the back is showing signs of sway back by pooling in the middle of my back. I pinned in the side seams from about waist height up to the bottom of the sleeve and then pinned the sleeve seam in a bit also for about 6 or 7 inches (the sleeves are set in flat - another interesting thing!) This was the result for the front, which I think is much improved.

I pinned in the seam lines in the back and I think that has helped the sway back.

I have marked these changes on my plan paper pattern and have cut it out of my fabric. Today I had planned to start sewing, but ended up doing a walk (climb?).

With some girls from the gym we walked from Picnic Point up to a place called Tabletop Mountain. The day was beautiful. I would put a photo up of the great view from the top, but the photos include the faces of my friends, so don't want to use them without their permission. The walk up and down was about 3 hours. On top of this I did 3 x 45 minute classes at the gym yesterday as they were doing a special release of new Les Mills programs.

I was a wee bit tired this afternoon so had a nap, instead of the intended sewing. Had enough time after my nap to interface the pieces needing it. I may have to try the 30 minute per day sewing so I can get started on this shirt. I am really looking forward to making it.

Friday, June 12, 2009

Burda wof 01-2009-112 Skirt ... Part 1

"Who says ladies can't be sexy? It all depends how you dress those curves, eg in a ... slim pencil skirt with a high corset-waistband that sculpts a first-class wasp-waist and pretty hips."

Well I sure could do with a wasp-waist! This all started when I tried on a skirt in these lines at an Australian boutique called
Cue. I love Cue clothing and can fit into them again.. hooray!

The skirt I I tried on had a high waisted yoke and was in a plaid with a bias panel on the front and a little frou-frou bit at the back hemline - cute as but the colours were a bit bright for me. However it did really give me curves (which I don't really have!) Some of that was to do with the bias plaid panel, but I decided I really needed to make a skirt in this high-waisted style. Enter bwof 01-2009-112!

Ta-da... finished skirt on hanger shot....


I had a lovely piece of wool/silk I picked up on the remnant table at Gardams so decided to use that and started tracing. The pattern has a facing only and no lining, but I decided that this style of skirt with this fabric really needed a yoke facing and a lining, so the learning curve started. This has been a great exercise as I have learnt a lot, even though it is not a difficult skirt.

First up, I decided that the fabric needs underlining as it is quite loosely woven and soft. Apart from fraying I didn't want my bottom-print staying in the dress after I had finished sitting down! Spoke to Felicity and a few others on Pattern Review for advice and decided to use a fusible interfacing called BMV-4. This is magic stuff and really improves the hand of the fabric. Soft and smooth but just gives it that bit of ooomph this fabric needed. (To purchase this interfacing - see Felicity at For Frock's Sake!). As the wool/silk was a remnant I had to be frugal with it's cutting (I also cut a vest to get the best use of this expensive lux fabric), so I ended up not having enough to do a facing for the yoke. As it was, I think this fabric was too thick to use for this so I used my lining fabric but also underlined it with BMV-4 so that it became a bit more gutsy! The lining fabric I used is called Goldliner, which is a pre-shrunk rayon from Gardams Fabrics.

From reading other's blogs I learnt to add Rigalene to the yoke facing - from Ann at Gorgeous Fabrics. Thanks Ann! Trena also had a post about this at The Slapdash Sewist.


This photo shows the whole facing with the Rigalene sewn to the side seams only. Note - lots of pieces in the yoke. If you make this skirt mark all the pieces carefully!


Then when attending a class with Felicity I also learned to put a little cap on the rigalene so that it would not poke through the fabric! I used some bias binding which I simply sewed over the ends of the rigalene.


I then used this post from Summerset of Pins and Needles to help me put in the invisible zipper. I have learnt this in a class and can do a good zipper but the pointers on matching the seam lines are invaluable and I managed this on my first pass...


I was pretty happy with that. Next up was to add a tab to the inside yoke over the top of the zipper. I don't know about you, but I hate hook and eyes that are all scratchy at the top of the zip. Usually I do nothing and the zip is fine by itself, but as this is so high-waisted I thought it could probably be reinforced a bit so there would be no zipper-slippage. First up I made a tab...

Then I put it in before adding the facing to the yoke. This is it closed....


... and open.
I used a snap as I really hate hooks and eyes and I think this will give enough holding power. If it doesn't I will change it to a button and button-hole. (I have seen this on other posts recently - Marji's posts about pencil skirts on Fibre Arts Afloat.)

Here is a pic of the inside of the skirt finished. The lining is a bit crumpled looking as I just pressed the outside yoke and hem really well using a clapper as the fabric was thick and bouncy and needed the extra press to give it a more professional finish.

And the reason there are all these photos of the skirt but none of the skirt on me... well it's too f***g cold! We are in the middle of a cold snap. Considering Winter has only just started we don't expect frosts yet or nights that drop to less then 0 degrees C (that is 32 degrees F)... brrrr! Frost on our front verge this morning...

Modelling session to follow as well as my next project... the Hot Patterns 'Fit to be Tied' shirt.